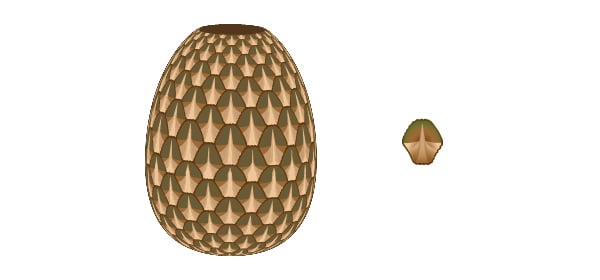
pineapple how to draw 3d
Read Time: 8 mins Languages:

Learn how to hands draw a vector pineapple using the 3D Revolve consequence, how to create the realistic texture and utilise it with the Map Art selection. This tutorial could also by a cracking way for you to practise your Pen Tool skills by drawing all the different leaves.
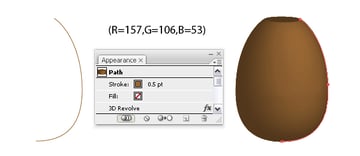
Pace 1: Pineapple Base
The commencement thing to do is to draw the curved path from the image beneath using the Pen Tool and to give it a 0.five pt Stroke. The color used is brown (R=157, M=106, B=53).

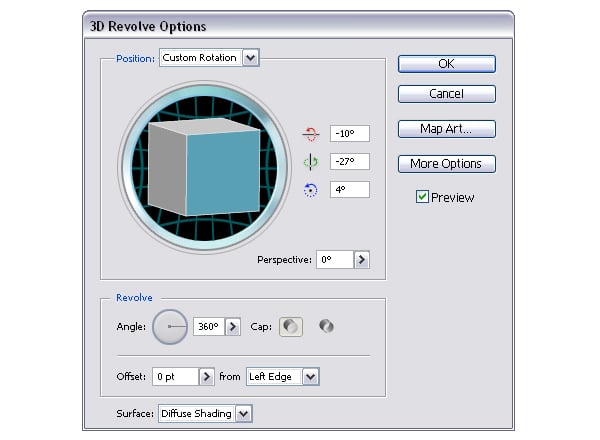
Step 2: 3D Circumduct
At present get to Event > 3D > Revolve and change the values (as shown below) to obtain the pineapple body shape.
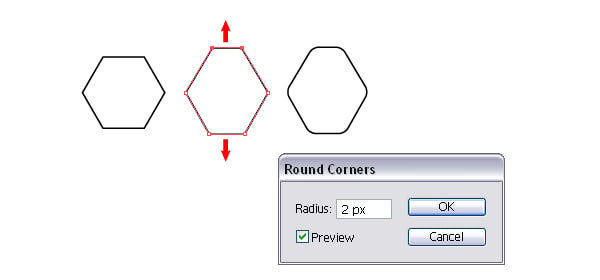
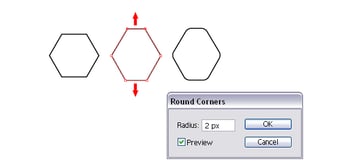
Stride 3: Polygons
Here is how to create the texture for the pineapple'due south body. Take the Polygon Tool and draw one. Now use the Direct Pick Tool to select just the tow top points and elevate them a bit up. Now practise the same for the 2 bottom points. Now become to Effect > Stylize > Circular Corners and prepare a 2 px Radius value.
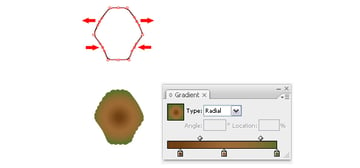
Step four: Irregular Shape
Go to Object > Path > Add Anchor Points to add together the four middle points on each side, then move them by pressing the arrow keys on the keyboard one time in the direction shown in the image for each betoken. My keyboard increase is set to 1 px.
Fill the shape with a radial gradient using the post-obit colors: nighttime brown (R=113, G=64, B=xix), brown (R=157, G=106, B=53) and greenish (R=93, 1000=112, B=43). To give it a more irregular look apply the Scribble Effect that you lot can find by going to Effects > Stylize.

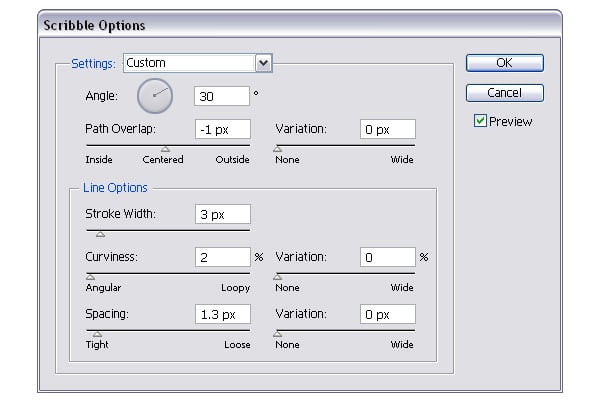
Stride 5: Scribble Options
Hither is how to modify the values in the Scribble Options window. When you are washed go to the Object menu and Expand Appearance.

Step vi: Cut and Color
Take the Pen Tool and draw the black shape from below. Merely the top portion is important, so draw that first, and so just shut the shape at the bottom. Re-create and Paste in front the scribble shape made before, so select both the black shape and the pasted 1, and click Intersect Shape Areas > Expand from the Pathfinder Console to obtain the second shape on top. Fill up it with a radial gradient from one color (R=139, G=86, B=32) to the next (R=237, G=198, B=153).
Re-create and Paste in Front this second shape. Using the Direct Selection Tool, movement the top betoken a bit up, then place the shape as shown. Copy and Paste in
Front end again the scribble shape and use it to Intersect Shape Areas > Expand as before. Fill the third shape with a radial gradient from one color (R=139, G=86, B=32) to the adjacent (R=211, Chiliad=167, B=118).

Step 7: Cut and Color More
Now draw the adjacent black shape that yous tin see below using the Pen Tool, and so Copy and Paste in Front over again the scribble shape, select them both and Intersect Shape Areas > Expand. Fill the obtained shape with a linear slope from ane color (R=139, G=86, B=32) to the adjacent (R=196, G=157, B=117) and alter the angle value to ninety degrees.

Step viii: Add together Some other Shape
Practice the same to create some other shape on top similar to the one fabricated above, simply smaller and fill it with a linear gradient from ane color (R=157, Yard=106, B=53) to the side by side (R=211, G=167, B=118). Change the bending value to 90 degrees this time too.
The last thing to do is to Copy and Paste in Back the start scribble shape made, scale information technology a scrap and alter the gradient to a radial one using green (R=93, M=112, B=43) and dark brown (R=97, G=55, B=xvi).

Step 9: Creating the Texture
Now using this group of shapes just made, you should create the entire texture just like the one in step ten, just then the texture will be likewise circuitous having so many shapes each one filled with a gradient and Map Fine art won't handle it very well. I tried information technology and I didn't liked the end effect, in that location was too much quality loss.
And then the best way is to simplify the texture and then recolor the shapes later on, this way every gradient will look every bit it should. Fill up the shapes with any colors that y'all want, simply a different one for each shape. Then grouping them all, multiply and arrange them similar in the image below with no gaps betwixt them.

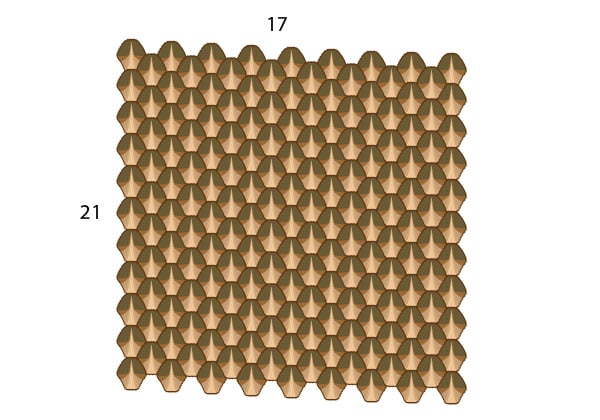
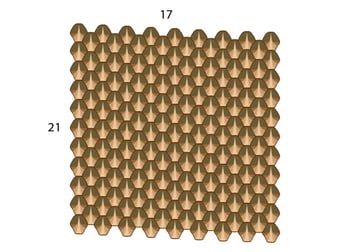
Step 10: Symbols Panel
Here is the entire texture that should be bigger than the pineapple'due south torso to make certain it will cover it properly. Mine is 17 by 21 rows. When yous are done group them all and drag them into the Symbols Console.
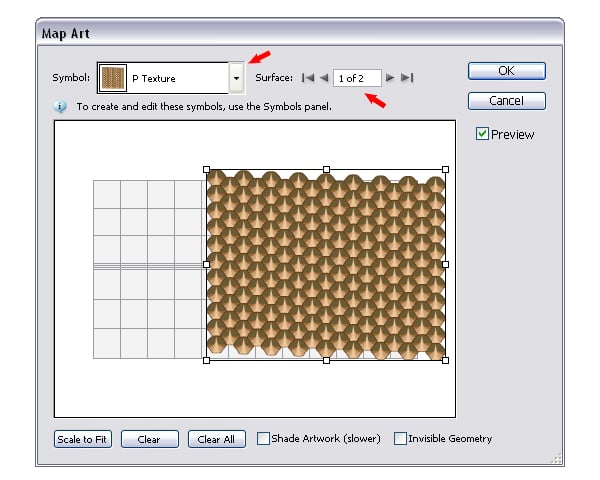
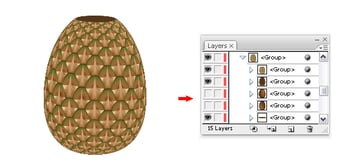
Step 11: Map Art
Select the pineapple body shape, double-click on the 3D Revolve effect applied in the Advent Console to open the 3D Revolve Options window, then click on the Map Art button. Select the front surface of the pineapple (mine was i of 2) and the symbol texture divers and then move information technology, if needed, until it fits properly on height of the pineapple.
Step 12: Expand and Recolor the Texture
You can run across in the adjacent epitome how the pineapple should expect at this bespeak. Become to Object and Aggrandize Appearance and and then information technology's time to recolor each shape back the way it was first made. This procedure will accept some time only if you select all like shapes and fill them all at once with the proper gradient specified at the kickoff, and so select other like shapes and make full them all at in one case, and then on you should finish faster.

Step 13: Hide the Original Trunk
Hither is how the pineapple should await so far. Besides if you zoom and expect closely yous should run across some brown edges all around the pineapple from the original torso fabricated at the beginning, so you should delete them or just hide them in the Layers Panel.

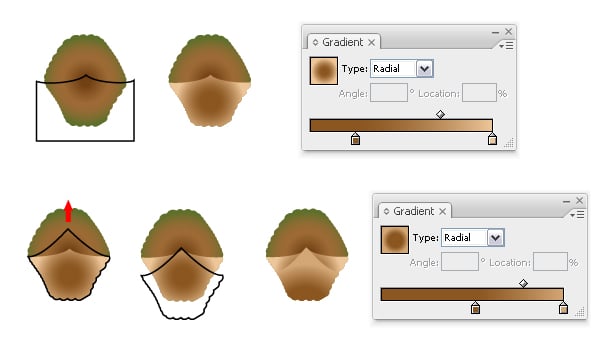
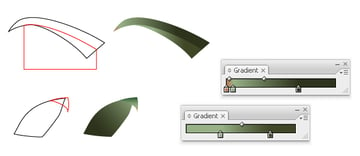
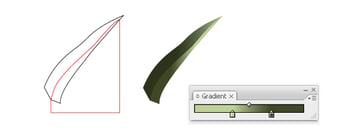
Step 14: Draw and Color Initial Leaves
It's time to describe the pineapple's leaves. In the images beneath you can come across some examples of leaves that I picked from all the ones in the final image. Take the Pen Tool and draw a leaf shape like the black i from beneath, then describe the cerise one on top.
Only the curved portion is of import then you lot should draw that get-go and so simply simply close the path at the bottom. Now Copy and Paste in Front end the black shape, select both the red ane and the pasted 1 and click Intersect Shape Areas > Expand from the Pathfinder Panel to obtain the smaller shape in front.
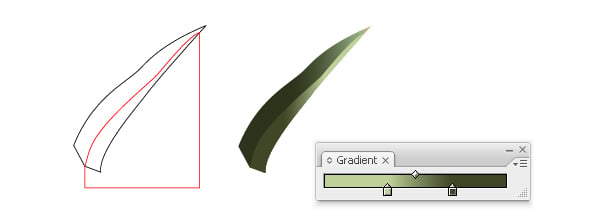
Fill the first shape drawn with a linear gradient using these colors: brown (R=188, G=125, B=82), lite green (R=152, G=177, B=134) and dark green (R=45, Thou=51, B=27) and also change the angle value, if needed, considering the brown color has to be at the tip of the leafage. The smaller shape is filled with a linear gradient from light greenish (R=152, 1000=177, B=134) to nighttime green (R=63, Chiliad=71, B=38).
Side by side describe the other leaf in the image and fill information technology using the same gradients.

Step fifteen: Leaves Shaping Up
You tin see in the prototype below some of the first leaves I made similar to the ones above.


Step xvi: Another Leaf Blazon
Here is some other type of foliage for which I used a brighter gradient. The colors are light green (R=190, G=210, B=151) and the same dark green (R=63, G=71, B=38) used before.
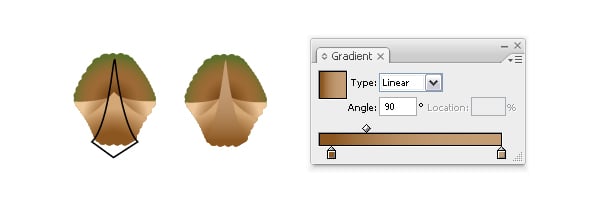
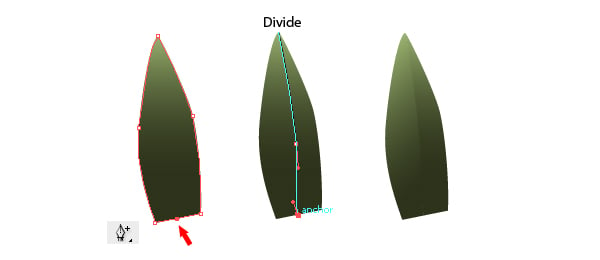
Footstep 17: Dividing Leaves
Some of the leaves are divided in two pieces and to practise that, after you depict the leafage shape take the Add Anchor Point Tool and add together a betoken like in the side by side image. So draw the curved path on tiptop starting from the top point to the one added.
It's important to intersect the top point of the path with the summit point from the tip of the leaf, and the last point of the path with the point added on the foliage shape, otherwise the Divide won't work. Select them both and click Divide in the Pathfinder Panel and y'all should at present accept the two pieces of the leaf. Change the gradient angle for one of them to make the difference more visible.

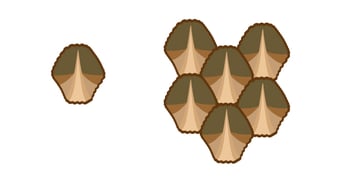
Stride 18: Combined Leaves
Continue to draw more leaves until you have something like this. As well you can see them all in the concluding image.

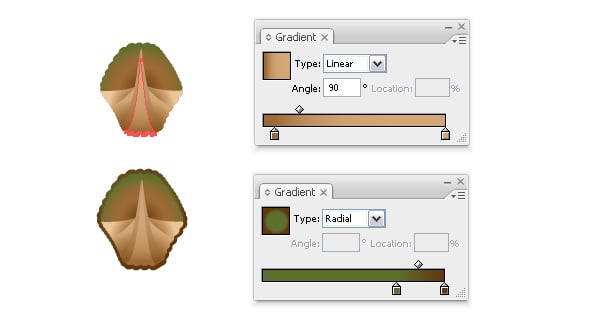
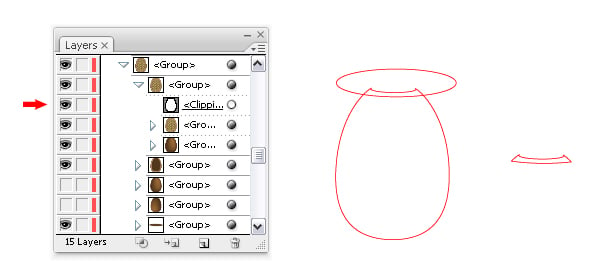
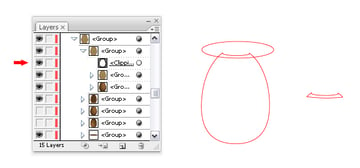
Step 19: Shadow Shape
There needs to be some shadow nether the starting time leaves drawn, then navigate between all the groups of shapes that are there after expanding the pineapple and you should detect a Clipping path. Copy and Paste it in Front, so describe an oval on pinnacle similar in the paradigm below. Select both shapes and click Intersect Shape Areas > Expand to obtain the small shape on the right.
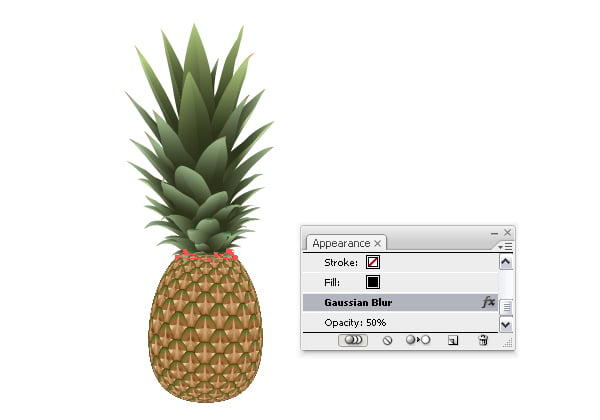
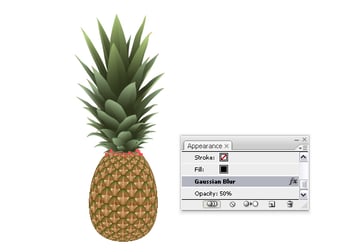
Step xx: Color and Blur the Shadow
Fill the shape with black, become to Effects > Blur > Gaussian Blur and set a 2px Radius value, then lower the Opacity to l%.
Pace 21: Add Small Shapes
The work is well-nigh done. Describe with the Pen Tool a few pocket-size shapes like the ones in the next paradigm and place them on the sides of the pineapple's torso. These details add authenticity to the pineapple. The colors used for the gradient are: dark chocolate-brown (R=54, Chiliad=36, B=21), chocolate-brown (R=139, G=86, B=32) and light brown (R=196, G=157, B=117).


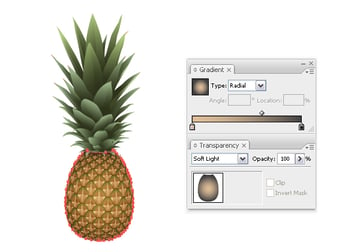
Footstep 22: Adding an Overall Gradient
The last thing to do is to apply a gradient on top of the pineapple considering I think it looks a bit plain without it. Now find again the Clipping path that you used earlier and Paste information technology in Dorsum (as well move it behind the little shadow shape), fill it with a radial gradient that goes from light brown (R=222, G=189, B=152) to dark gray (R=26, One thousand=26, B=26) and change the Blending mode to Soft Light. Adjust the gradient using the Gradient Tool if needed and you lot are washed.

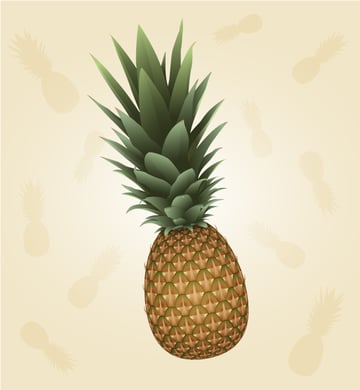
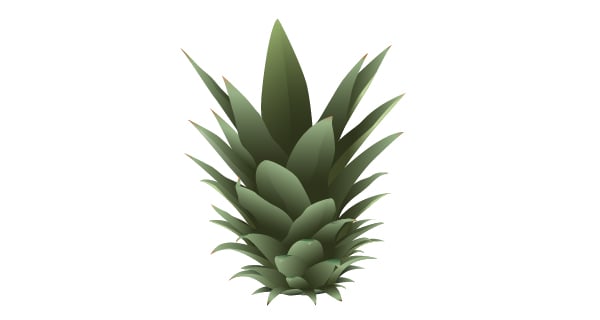
Final Image
Here is the final prototype of the vector pineapple and I hope you enjoyed this tutorial.

Source: https://design.tutsplus.com/tutorials/draw-a-realistic-pineapple-using-3d-illustrator-effects--vector-4055
0 Response to "pineapple how to draw 3d"
Post a Comment